
Gadgets
Step-by-Step Guide: Installing Unraid on the Ugreen NASync DXP4800 Plus

Any links to online stores should be assumed to be affiliates. The company or PR agency provides all or most review samples. They have no control over my content, and I provide my honest opinion.
I reviewed the superb Ugreen NASync DXP4800 Plus back in November. I was already using the Ugreen NASync DH4300 Plus with the stock UGOS software, so I wanted to migrate my old TerraMaster F4-421 running Unraid to the Ugreen.
The Ugreen has a substantially more powerful CPU with Intel QuickSync support. It also has dual M.2 NVMe drives for caching, and a 10GbE port. This makes it ideal as a media server for Plex or Jellyfin.
While I could have used Docker to set UGOS with the applications I use, it made more sense to use Unraid. All my files were on an existing Unraid array, so all I needed to do was swap the disks over, and Unraid supports a huge number of applications via the Community Apps Store, which is much easier to use than manually setting up Docker containers.
Ugreen NASync DXP4800 Plus Specification
| Model | DXP4800 Plus |
| Price | £539.99 |
| Drive Bays | 6 (4+2) |
| SATA Hard Drive Slots | SATA 4-Bays |
| M.2 NVMe Drive Slots | 2x M.2 Slots |
| Maximum Storage Capacity | 136T (30T4+8T2) |
| CPU | Intel Pentium Gold 8505 5 Core 1 Performance Core 4 Efficient Core 6 Total Threads Intel Quick Sync Video |
| RAID Mode | JBOD/Basic/RAID0/RAID1/RAID5/RAID6/RAID10 |
| HDMI | 4K 60Hz |
| Standard Memory | 8GB DDR5 |
| Maximum Memory Expansion | 64GB |
| LAN Port | 1x 2.5GbE, 1x 10GbE |
How to install Unraid on the Ugreen NASync DXP4800 Plus
It is quite a simple process, albeit a touch more involved than converting TerraMaster to Unraid.
Unraid USB Dongle
You don’t install Unraid like a normal OS. It is installed on a USB drive and boots from this. When booted, the OS itself resides in the RAM.
There are some quirks with this installation, though.
The standard installation process is to use the USB Creator for your chosen OS. But, the USB drive needs to have a unique GUID (Globally Unique Identifier).
When I came to doing the reinstall, it didn’t recognise my old drive, so I had to redo the install and transfer my licence. However, I quickly found that many of the spare USB drives I had lacked a GUID.
I also experienced some issues transferring my licence. When you transfer a licence, it blacklists the old GUID. So, I ended up making two USB drives incompatible with Unraid as the GUID became blacklisted.
On a positive note, when I did have issues with my licence, I had to contact the customer support, and they resolved the issue within a couple of hours. This was surprisingly efficient considering how dreadful customer support is with most companies nowadays.
BIOS Changes
Disable Watchdog
One important change you must make is to disable the watchdog within the BIOS. If you do not do this, Unraid will randomly reboot
The watchdog service is a low-level safety feature that automatically reboots the system if the operating system stops responding. This is handy for unattended use as it helps prevent you from being locked out of the NAS if the system freezes.
However, when you boot into a new OS, the watchdog mistakenly thinks there is an error and reboots.
To disable this service, you will want to hook up the NAS to a monitor and keyboard, then you can access the BIOS by pressing CTRL + F12 when you see the Ugreen logo.
It was likely user error, but when I did this initially, I found that my NAS still rebooted, only to find that Watchdog was still enabled in BIOS. I probably didn’t save it properly, but if you experience unexpected reboots, then this will likely be the cause.
Disable Ugreen Boot SSD
Additionally, I’d recommend disabling the NVMe drive that is associated with the Ugreen OS. This will help prevent it from showing up in the Unraid if you have the unassigned disks function and reduce the risk of accidental deletion. In my case, my Unraid licence only allows 6 disks, so I had to disable it if I wanted to use the other 2 NVMe slots.
As I had already installed my NVMe drives, I had to experiment with which slot was the Ugreen OS by disabling and booting the OS. For me, I think it was SSD2.
Change Boot Order
Finally, you will want to change the boot order to boot from the USB first.
Unraid Set Up
I won’t cover this extensively; the process is quite simple.
The Unraid setup is typically set up to run one or two parity drives and use cache drives for improved performance. One reason I like Unraid is that their version of RAID is power efficient; the drives work more like JBOD, with data written to each drive individually, rather than using all drives at once. You can then set the other drives to spin down when not in use.

Using NVMe cache drives will make the user experience much better; all the app data will be stored on here, making the system much more responsive.
When it comes to initial storage, items like downloads will be stored here before eventually being transferred to the array, depending on the system setup. The community app store offers a wide variety of apps, including all the popular ones that a typical home user would need.
Some of the essential apps available include Plex, Arr Apps like Sonarr, Radarr, Lidarr, and Overseerr, Sabnzbd, AdGuard Home or PiHole, as well as native Tailscale support.
Converting the Intel-based Ugreen NASs to Unraid is a straightforward process, making them an ideal system for NAS use due to their great hardware at a reasonable price and compact form factor.
Please note that the information provided may change, with the last update made on 2025-12-24, and this article may contain affiliate links. Images are sourced from the Amazon Product Advertising API.
Meet the author:
James is a tech enthusiast based in the UK and the Editor and Owner of Mighty Gadget since 2007. He has a passion for all things tech, from computers and networking to mobile devices, wearables, and smart home gadgets.
With a keen interest in fitness technology due to his love for running and cycling, James brings a unique perspective to tech blogging, combining lifestyle, fitness, and the latest tech trends. Mighty Gadget has been consistently recognized as one of the top technology blogs in the UK by Vuelio, showcasing James’ dedication to technology and insightful content for his readers.


Maximizing MacBook Battery Life: Tips for Charging Slowly and Setting Charge Limits

Lost Legacy: The Disappearance of AC Schnitzer and the Changing Automotive Landscape

Cyber Warfare: The Battlefront of the Digital Age

Monster Hunter Stories 3: The Challenge of Twisted Reflection

Revolutionizing Cash-Pay Clinic Prescribing: VITL Secures $7.5M Amid GLP-1 Boom

Balancing Act: The Decision to Shut Down Sora

Exclusive Arrival: Cupra Born VZ Lands in Australia – But There’s a Twist!

iPhone 12 Pro Max vs Samsung Note 20 Ultra / Huawei Mate 40 Pro Camera Test Comparison.

ClickFix: The New Threat to macOS Security

EU Takes Action Against Instagram and Facebook for Violating Illegal Content Rules

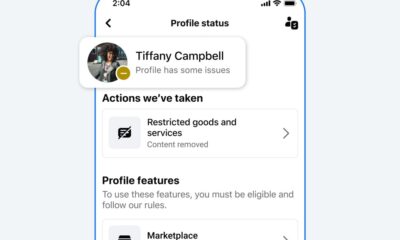
Warning: Facebook Creators Face Monetization Loss for Stealing and Reposting Videos
Facebook Compliance: ICE-tracking Page Removed After US Government Intervention

Facebook’s New Look: A Blend of Instagram’s Style

Facebook and Instagram to Reduce Personalized Ads for European Users

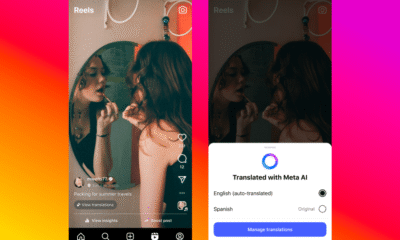
InstaDub: Meta’s AI Translation Tool for Instagram Videos

Reclaim Your Account: Facebook and Instagram Launch New Hub for Account Recovery

Meta discontinues Messenger apps for Windows and macOS

Breaking Updates: Meta Connect 2025 Unveils Latest Developments
iPhone 12 Pro Max vs Samsung Note 20 Ultra / Huawei Mate 40 Pro Camera Test Comparison.

iPhone 12 Pro Max vs Samsung Note 20 Ultra / Huawei / Xiaomi / OnePlus Battery Life DRAIN Test.

The BEST Smartphone of 2020 🏆

The Self-Healing Smartphones!

Apple is not what it used to be.

Smartphones are Boring now.

The Fastest Android Phone Ever.

Unboxing the $122,000 Smartphone. 🤯

Are Linux Smartphones about to KILL Android?
-
 Facebook5 months ago
EU Takes Action Against Instagram and Facebook for Violating Illegal Content Rules
-
 Facebook5 months ago
Warning: Facebook Creators Face Monetization Loss for Stealing and Reposting Videos
-

 Facebook6 months ago
Facebook Compliance: ICE-tracking Page Removed After US Government Intervention
-
 Facebook4 months ago
Facebook’s New Look: A Blend of Instagram’s Style
-
 Facebook4 months ago
Facebook and Instagram to Reduce Personalized Ads for European Users
-
 Facebook6 months ago
InstaDub: Meta’s AI Translation Tool for Instagram Videos
-
 Facebook4 months ago
Reclaim Your Account: Facebook and Instagram Launch New Hub for Account Recovery
-
 Apple5 months ago
Meta discontinues Messenger apps for Windows and macOS